Showing posts with label sewing. Show all posts

Tuesday, 5 November 2019

Quilting capers

Apologies to Quorn Country Crafts, but this is very late getting written up!

I went to a quilting exhibition a couple of weekends ago, organised as a charity event by QCC in East Leake. You may remember I'd been before, when the shop was still in Loughborough. This time it was held in a school hall.

To give you an idea of the size of some of the quilts

Many were for sale

It's always good to see quilts others have designed and sewn, as they give you all sorts of inspiration for future projects. This time, I think there were more 'picture' quilts than ones focusing on mixes of colours, which just goes to show how trends and fashions change. Especially when it comes to the use of machined details and applique.

Here are some of my favourites from the day...

Lovely overlapping squares in monochrome

Another optical illusion - love these colours

I loved the lime green with the aqua

Some needlefelting too...

3D butterflies and a fabulous elephant

Twelve months in applique

A thought provoking message with this one

A fleecy quilt, rather than the usual cotton

Loved how the strips framed the central panel

I've never mastered circles...

More fun applique

Lots of machine-stitched applique and embroidery in the panels

Loved these colours

Lots of machined lace as embellishment

Completely hand-stitched...

...and a lovely pattern

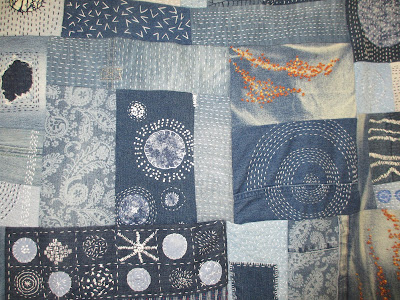
My absolute favourite though, was a quilt made entirely out of denim, and slow-stitched, Japanese style. It was such an obvious labour of love, with hours of work going into all the hand stitched details and decorations. It didn't have straight seams, because the denim and indigo fabrics were pieced together fairly randomly, and I loved the individuality of it.


 Afterwards, I had to stop by the shop, of course. I haven't got any fresh projects in mind (I have two quilts on my bed, one in the spare room, Squidgeling T's quilt's in Manchester, I've done two lap quilts and was very, very close to finishing Squidgeling J's quilt) that I mooched for a bit and gave in to a pack of tiny squares (might be OK for a cushion cover), some Christmas project fabric, and a charm pack in lovely pinks and aquas. Perhaps another lap quilt...?


I was inspired to go home though, and finish binding J's quilt. It is the first time I think I've ever been dressed in the colours of a quilt as I've bound the edges!

Love putting the binding on.

Colour co-ordinated quilter!

Close up of the 'squircles' quilted on the top

Mr Squidge, showing off the full size quilt.

Then I took some fabric I'd had for ages - with the aim of using it for cushion covers in the lounge - and cut it all into strips to make a kind of DIY jelly roll. I'd seen a video where you can make stripes along the length of a quilt rather than across, and the way it goes together is rather random. Now if I've learnt anything about myself and quilting, it's that I'm not very good at random. I like to lay everything out and get a balance of colours before I start, so this is a bit of a challenge. I'll keep you posted...


Wednesday, 25 September 2019

Slow stitching a story

If you've followed the Scribbles for a while, you'll know I like being creative in ways that don't just include words. Most recently, I've quilted, although I don't tend to use old fabrics in the way that true patchwork originated.

Today, I got my chance to combine story-telling with stitchery.

My church is hosting an exhibition in November, called the Art of Remembrance; a local artist, Jacqui Gallon, has a particular interest in using art with folk who have been bereaved, and is facilitating the workshops which support the project. The idea is that anyone can remember their loved ones by creating simple artworks - artworks that will be displayed during the exhibition at church.

(I'd already enabled one piece of art at NIBS - we used the 'I remember' exercise again, thinking of people we'd loved and lost, then wrote out words and phrases with coloured pastels and chalks and felt pens onto large sheets of paper. These large sheets will be quartered and used in one of the artworks.)

Today, we did slow stitching. It's a coming together of simple stitching - if you can thread a needle and do a running stitch, you can slow stitch - and of memories.

There was a wonderful array of materials to choose from - some dyed with natural plant material foraged from our church woodland - and after a brief introduction from Jacqui, we chose our bits and pieces and set to on a 'warm-up' which developed into the real thing. It was a privilege to be privy to some of the memories that had inspired the choices of fabrics and embellishments, and I can't wait to see them all displayed.


Moira's workbasket and some sample pieces

I thought I'd share the story behind the two pieces I finished and the one I have to complete.

Green.

My grandparents both had gardens. Grandma's was long and thin and sloped up behind the house. It was a functional garden, growing gooseberries and currants and veg - the only bit of lawn was right at the far end, near the shed, and I remember the bean canes behind the shed...

Granny and Grandpa's garden was much bigger, but there was still a lot of it turned over to produce. I remember Grandpa making pea pod wine after he'd shelled his peas...and my uncles breaking into the 'wine cellar' to drink it at the wake after Grandpa's funeral. There was a much bigger lawn, and paths around the back of the borders that we used to run around. Granny was registered blind, so sound and scent was important to her in the garden, so I was delighted to find a piece of fabric with a little bird sitting in a tree.

I knew this piece had to be green. As I sewed, the straight lines reminded me of the lines of produce, and I left the ends trailing because in spite of how carefully you plan your garden, there are always some plants that can't be constrained to the lines... 


Clothes.

I also have distinct memories of some of the clothing worn by my grandparents. Grandpa was a working man, so I remember his boiler suit. I also remember him in cricket whites at a weekend during the summer. Granny loved colour, even though she struggled to see it sometimes, and I can still see her in a kaftan and large floppy sunhat on the beach in North Wales when we holidayed together. With Grandma, I think of aprons and crimpolene dresses - she believed when you got to a certain age, you should dress a certain way. She only ever used one dress shop in Leicester, because it sold those kind of dresses.

Seeing the shirt in the material stash made me think of clothing, and although it's nothing like anything my grandparents would have worn, it gave me my theme. Using a complete piece of the garment meant it was recognisable as an item of clothing rather than simply a scrap of fabric, and it provided a strong link to my memories.


Black, red and blue.

A good friend of ours died suddenly, years ago, in a motorbike accident. He was - at different times - a boat builder, a policeman, and a fireman. We only tended to see him at Christmas, at a black tie dinner a group of us have held annually for almost thirty years.

This one has got to be stitched yet, but I chose fabric for the red and blue of his professions, and I want to stitch waves instead of straight lines, for the sea. The black fabric, black sateen ribbon and a black button represent the dinner jacket he'd wear at our Christmas dinners. I'd have loved to include a piece of black leather too - mainly for the bike leathers he stripped out of (having biked all the way from Orkney) at our wedding, revealing his posh suit underneath... But also because ultimately the motorbike he loved was the reason for us losing him.


It was a real privilege to see the thought and memories that poured into these simple artworks - many of them probably no bigger than six inches square - and I am sure they will prove to be a powerful stimulus for others when they are viewed.

And if you doubted that we had fun - remember that nice neat table at the start of the session? This was it halfway through the session...!


Tuesday, 16 April 2019

Batik-y and zingy quilting

Although I've been 'camping' this month, editing my next novel, I am trying to do other things as well.

If you're a regular reader of the Scribbles, you'll know I also knit and stitch - and in recent years I have taken to quilting. In between editing, I've given myself breaks by working on some quilting. I thought as a change from updates of 'number of words I've edited', I'd post a few pics of 'quilting I have done' instead.

My last quilting update was back at the beginning of February; I'd finished two large quilts for myself and Squidgeling T, and was about to embark on a lap quilt in zingy colours AND a large blue batik-y quilt for Squidgeling J. Here's where they're at...

Blue Batik-y quilt:
The top was pieced together a while ago, but as Squidgeling J was in Bristol, I waited for her to come home so we could go to our local fabric shop to find the backing fabric and all the other bits and pieces I needed to start the hand quilting. (We went last week - also bought fabric to border and back a lap quilt of whirly hexes that Squidgeling J's making for herself). We ended up with a beautiful turquoise and deep pink-red batik fabric which draws out the pinks and purples and brighter blues in the quilt top.

Yes, it's the back of the quilt top and just a little bit of the backing fabric

Next step is to join two pieces of the backing fabric, then pin all the layers together before hand quilting. Not sure what pattern to use yet - we've played around with some ideas, but nothing's fixed. And as the weather gets warmer, it'll be too hot to do. Might have to wait until the autumn to get going on it...

Zingy Lap Quilt:
I managed to piece this together fairly quickly over a few days, and had enough cut-offs of wadding to not need to buy any new.

The backing - well, I admit I skimped on this one. I bought polycotton rather than 100% cotton, but I was so taken with the colours (which match the top) I knew I had to use it.


I found seven coloured cottons that matched some of the fabrics, and proceeded to hand quilt by picking up the patterns on the top.


spirals, wavy lines, flowers, crosses, squares...

I realised quite quickly that I didn't like the plain white in between all the coloured squares, so I made extra work for myself by deciding to stitch just inside the borders of all the white rectangles as well, making sure - as far as was possible - that there weren't any two adjacent rectangles stitched in the same colour of cotton.

Guess who likes sitting on it...

All that's left for me to do on this one is piece together the border strips, machine sew them onto the quilt, then catch down on the back by hand.

Probably ought to put down my needle and get back to camp now, though. Haven't edited anything yet today...and that story won't edit itself. Catch you later!

Monday, 4 February 2019

Catching up on quilting

Way back last autumn, I mentioned that I was trying to complete a quilt I started the year before that, and it was taking ages to hand quilt the spirals... Well, although I didn't blog about it at the time, I got it finished in time for Christmas, and it's been on my bed for quite a while.

Here's a couple of photos of some of the details I'm particularly pleased with. Please excuse the fluff on the first photo - the cat loves to sleep on the end of the bed, and I didn't realise quite how much fluff he'd left behind til I'd taken the photo!

Me? Leave fluff? Never!


Might actually be getting the hang of neat corners! And the spirals aren't too bad either.

The purple backing/border fabric went so well with the batik strips

Since completing that one, I've also completed a third large quilt - for Squidgeling T, when he goes off to uni later this year. (He's doing a degree in 'How to be a Rock Star', aka BA in Professional Musicianship on his bass guitar). I found a lovely layer cake in denim blues and greys, and Squidgeling T asked for bright red to set them off. Here's how it ended up:

Front of quilt - the red really makes it pop!

Some of the larger layer cake squares were cut into four and edged with the red, while the rest were kept whole - then a large square and an edged square were alternated. The backing fabric - which I used to edge the quilt as well - was a beautiful denim blue, and I found a matching variegated denim and grey thread to hand stitch the quilting pattern. After the free-form spirals on the last quilt, I went very geometric again; stitched in the ditch along the main join lines, then stitched inside both the small squares and the large squares, because otherwise there'd have been far too much unquilted area between stitched points.

Back - I used up the leftover layer cake squares to add a stripe.
You can just about make out the quilting pattern on the plain blue
if you look hard...

I have to say that the border on this one is probably the best I've ever done - proper right angles and everything! I finished it yesterday evening, and it was on T's bed last night.

Cracked it on the corners!

Next project? Well, I'm going to make Squidgeling J a quilt for her bed. We found a rather nice pattern to use with a blue batik jelly roll;

Working out how many strips from each design of fabric I'd need...
Blues, aquas and pinky-purples in the mix


Imagine this pattern, repeated over and over

I also have a charm pack of very bright coloured patterns which I'd like to use to make another lap quilt, using the same pattern as above. Lap quilts are so useful when I'm sitting typing...or having a snooze on the settee when a migraine or other illness hits.

Such zingy colours!

And yes, I have realised that this isn't getting much writing done. I will get there. Eventually.

Sunday, 11 March 2018

Novel finished, so time to quilt!

Writing news first...

I've finished Rurik-Reeka-Tilda. Hooray! It's taken me almost ten years to really get to grips with this story and make it something I'm really proud of. I sent it out to a few beta readers for a teccy review, and the feedback is about 98% positive. There are always going to be a few niggles and glitches to put right, or consideration to be given to plot points, but on the whole, I'm pretty chuffed with it.

Two out of the three readers returned their comments very quickly - they'd read the novel within 24 hours, so I came up with a new word to describe this...

Pageturneyness.

That is, a measure of how much your reader keeps turning the page - and I'm pleased to say that the Mage of Merjan (yes, the story now has a title) seems to score highly in that regard. (At which point Squidge breathes a huge sigh of relief).

Pageturneyness is second only to Unputdownableness in the authors eyes...

But, having finished the writing, I've given myself a break before I embark on continuing to write the second book in the series. So I went on a one-day Mini-quilting course at Quorn Country Crafts.

Here's what a mini-quilt looks like;

This is a sample of what's achievable, made with one inch squares.
Not for the beginner in this technique! Love the corners on this mini-quilt. 

We were going to make some blocks from one and a half inch squares, ending up with maybe a couple of the designs from this selection;

The block to the left above the blue based block is the one I did...

First task - choose our colours. I'd seen the sample blocks, and decided to try to make some placemats for our new kitchen, which, if you remember, is grey units, black worktops and yellow on certain walls. I had quite a few bits and pieces from both my own and Squidgeling J's projects, so here's what I took with me.


We started by cutting freezer paper into one-and-a-half inch squares (this stuff is like magic - sticks to your fabric when you iron it on and enables really precise cutting). Then, we cut one-and-a-half inch strips of four fabrics and a background colour, which all had to be cut into one-and-a-half inch squares.

3 x four colours, 16 x background

Have to say, I'm not known for being a tidy worker...


For the triangles - or half squares - we used a different tactic. Four-and-a-half inch strips of each of the four colours were sewn to one long strip of background... Opened out and with the seams pressed, we then applied the freezer paper at an angle across the seam so we got perfect triangles of each colour.


Prepping the half square strips to save on waste

Loads more cutting followed, until you had the half-triangle squares, then you could peel off the paper.

Then the fun part. In the next pic, you can just about see the grid we worked on. We cut enough iron-on interfacing to cover 6 x 6 squares. Then, we very - VERY - carefully positioned our patterns of squares over the grid, taking care not to cover the black lines. A bit like when you get a box on a form for your signature, and it says 'Do not go outside of the box'...

These were then carried - oh, so carefully - to the ironing board and ironed into place, with paper above and below to prevent any of the glue transferring onto the iron.

First block of squares stuck to the interfacing

Now, the fun part - actually stitching! You sew a quarter inch seam on the back for every row of squares, cut through the interfacing, iron open, turn 90 degrees and repeat.

Front of block after the first set of seams

Uncut seams on the back

Amazingly, the block shrinks by one and a half inches both ways - and you end up with this;

Finished block!

You'll notice the edge squares look slightly rectangular - that's because they still have a quarter inch seam allowance for the border to be added. I was really impressed though - my triangles were all pretty much perfect!

It took me a while to get to grips with the basic technique, but after that, I was on a roll, and prepped and stuck down three further blocks. I stuck to the same basic pattern, but varied the fabrics in each one while sticking to a mix of grey, black and yellow.

 Today, I've finished them off;

Four blocks, ready to be bordered, backed and bound

It's a great technique, providing you are careful with your ironing and don't melt the interfacing. And get your positions right on the grid. And get all your squares cut up front if you are doing multiple blocks.

The results the other ladies got were fabulous too - some amazing mixes of colours, and using a source book, lots of different pattern possibilities too. I wish I'd had time to take pictures of some of the others... It works best with plain colours or small prints without large areas of space between the printing, and you can blend or contrast the colours to give different emphasis to the block pattern. Huge thanks to Jill for sharing the technique with us and for giving me yet another project to complete...

I'm wondering whether, when I get a chance (!) I can do this kind of thing with lots of different coloured fabrics. A whole block of shades of blue, for example, or reds, or turquoise, perhaps in patterns, perhaps not, and then put those together into a big quilt...

Think I need to write another novel between now and then, though, or the Mage of Merjan will never be joined by the other four books!